
Process and Symbols
Process
Jody Padgen
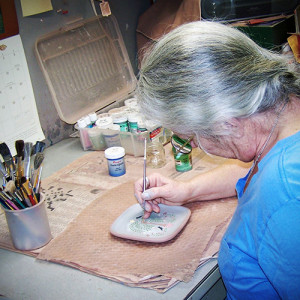
Although the actual carving of the design is by far my favorite part, there is a much more detailed process in getting to the finished piece. I’ve been told many times that I don’t appreciate all the steps because I just automatically do them and this is some what true, but there are the little joys in every step that I find satisfying at each stage in the process. Just like playing in the soil in my garden from the beginning of each spring to last days of fall, I enjoy doing each part of the process for its own distinct feeling and result. Starting with a 30 gallon trash can and a drill for the red liquid clay to slip-cast my plates to the final opening of the kiln – each has its own rewards.
There is nothing glamorous about a 50 pound bag of dry red clay and the hours of mixing it takes to get to the right consistency, but when you get from the instant pudding stage to the desert canyon red rock flow of silt there is magic. It just happens when all the clay particles disperse and the slip flows perfectly.
After slip casting the plates, hand cutting the tiles and waiting for everything to dry, I rasp and sand all the edges and backs, then wipe them with a damp sponge to get rid of all the dust. Then I can finally sponge the white liquid slip on top, and get ready to draw a light sketch of my design to follow when I carve. I do try to carve quickly, while the slip is damp, since you get such a nice smooth carve and a clean line before it dries.
After letting the piece dry completely I add the colors with 2 or 3 coats of liquid under-glazes, and let it all dry for a day before kiln firing to 1700 degrees in an electric kiln for eight hours. I wait at least another day before the kiln is cool enough to open and empty.
After wiping the pieces off with a stiff towel, I apply a few coats of dinnerware safe clear glaze, let it dry completely and fire a second time. Again I patiently wait for the kiln to cool before opening. This is where the anticipation sometimes gets me and I’m almost willing to burn my fingertips off just to see what’s inside.
Symbols
Pennsylvania Dutch

I started doing the Pennsylvania Dutch work because it was what I grew up looking at. I learned then what the different symbols on each piece meant. Giving a personalized plate or bowl was not just a decorative well-wishing gesture, but it was meant to be used! There are many incredible pieces to be found in the Philadelphia Museum of Art’s Pennsylvania German section and each one easily portrays a story that the artist was telling.
Double Distlefink (Thistlefinch) ~ Joining together of husband and wife
Pineapple ~ Hospitality
Heart ~ Gods goodness and grace
Wheat Spray and Seeds ~ Fertility
Triple Tulip ~ Faith, hope and love
Scallop Circle ~ Eternity
Thistles
The thistle has long been known as a symbol of strength.
Celtic Knotwork
Celtic Knotwork is a symbol of the continuity of our journey through life towards the sacred center and the interconnection of all things.
I find it difficult to spell out the different meanings of the knotwork. Certainly there are specific knot types – trinity, spiral, key, four-part, to name a few. They come from many different eras and locations. But for me,I get a feeling when looking at them. My heart beats faster, my thoughts flow, my fingers start to twitch, and I want to create something! The knotwork is limitless. I can use any colors I want and since you can never run out of patterns, this is what really fuels my fire.